


The name Grandma belongs in the kitchen. She always made the best apple pies in town. But let’s not get lost in pie memories—this is about Grandma’s deep cleaning tips, not her baking!
FOOD IS LIFE, AND THE KITCHEN IS WHERE IT STARTS
Why do kitchens always get messy, and why is it so hard to keep them clean? Simple—this is where life happens, and life is messy. Just like everything else, kitchens need a good, deep clean.
Cleaning your kitchen takes more than a quick wipe-down. Grease and food particles sneak into places you’d never expect.
The most important thing is hygiene. A clean kitchen means clean food. Makes sense, right? It may seem like a lot of work, but it can actually be fun. So why not start now?
You’ll clean your kitchen like a pro, step by step, until it looks brand new.
First, clear out the dirty dishes. Load them into the dishwasher or wash them by hand—whatever works for you. The key is to get them out of the way.
1. TAKE OUT THE TRASH

Start by taking out the trash. A full garbage bin can make your kitchen smell bad, so it’s best to get rid of it right away. Remove the trash bag and let the bin air out.
For extra freshness, spray some rubbing alcohol inside the bin and let it sit while you clean. Also, keep a new trash bag nearby for any waste you’ll collect while cleaning.
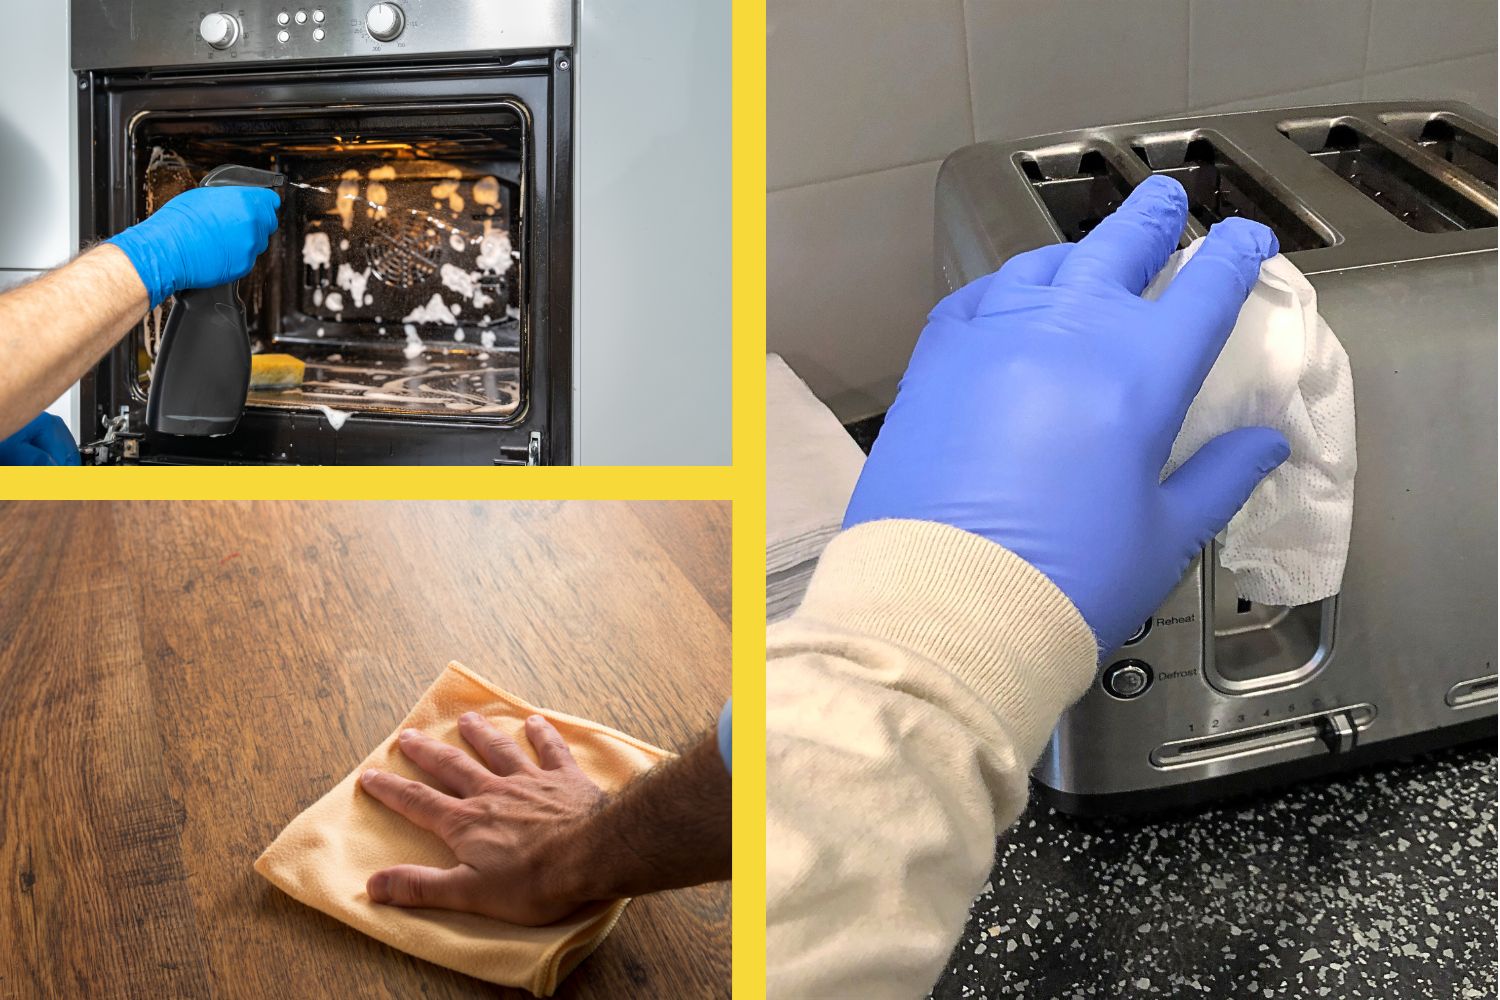
2. CLEANING THE TOASTER

Flip the toaster upside down to shake out any crumbs. Next, remove the crumb tray and wash it with dish soap.
To clean the outside, wipe it with a slightly soapy cloth. Then, use a clean damp cloth to wipe off any soap.
Never submerge the toaster in water—it can cause electrical damage and stop working.
3. THE COFFEE MAKER
Your coffee maker probably has some tough stains—coffee is great for flavor but not for keeping things clean!
If the water reservoir is stained (which it likely is), mix 1 tablespoon of vinegar with ½ cup of water and pour it in. Let the mixture boil completely.
Once done, empty it out and add a cup of fresh water. Boil it again to rinse away any leftover vinegar and loosened residue.
This removes stains, cleans hard-to-reach spots, and gets rid of any vinegar smell—leaving your coffee maker fresh and ready for your next brew!
4. CLEANING THE BLENDER
There are many ways to clean a blender, but here’s a simple and effective method to get it thoroughly cleaned.
Start by unplugging the blender for safety. Then, remove the bottom part—the section that screws off. This area often traps food particles that you may not even notice, leading to bad odors and bacteria buildup. Wash this piece along with the blender container using warm water and dish soap. Make sure to scrub around the blades carefully, as they can hold hidden residue. Once clean, rinse everything with cool water and let it air dry completely before reassembling.
For the blender base, never submerge it in water. Instead, take a damp cloth and gently wipe it down to remove dust, spills, and stains. If there are sticky spots, a little baking soda mixed with water can help clean them without damaging the surface.
Keeping your blender clean not only makes it last longer but also ensures your smoothies, soups, and other blended treats stay fresh and safe to drink!
5. MICROWAVE OVEN
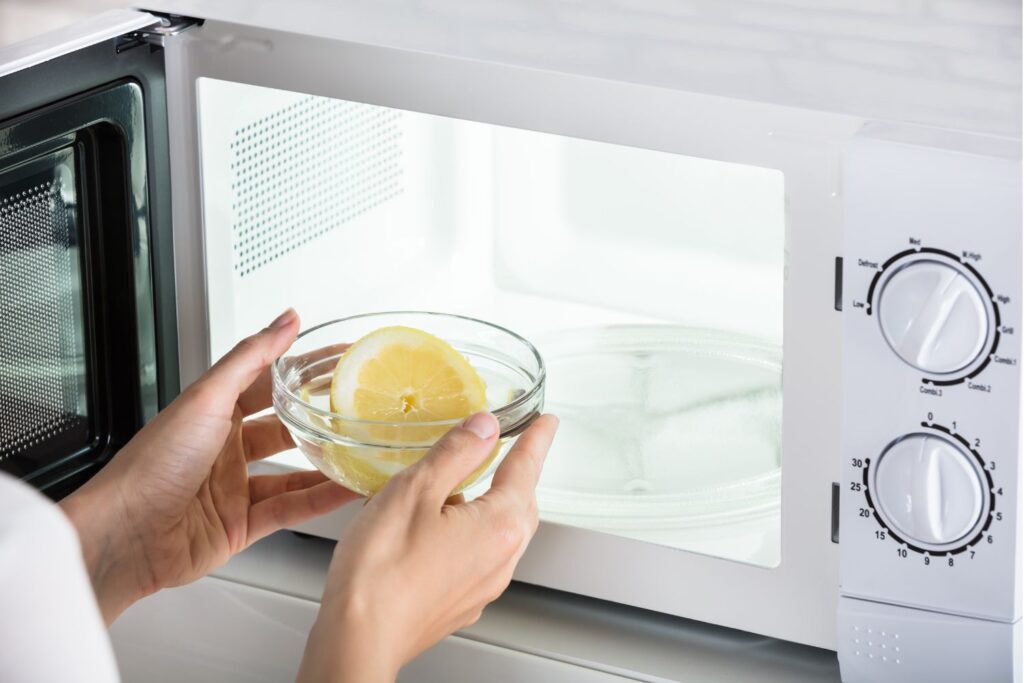
If your microwave smells bad and has food splattered everywhere, don’t worry—there’s an easy fix!
Fill a microwave-safe bowl with water and add half a lemon. Place it in the microwave and heat it for 2 minutes. The steam from the hot water will loosen stuck-on food and grease, making it much easier to clean.
Wondering what the lemon does? It acts as a natural deodorizer, helping to remove any lingering smells.
Once the time is up, carefully remove the bowl and use a sponge or cloth to wipe down the inside. The loosened residue will come off effortlessly, leaving your microwave fresh and spotless!
6. CLEANING THE CABINETS
You’ve probably heard plenty of cabinet-cleaning tips, but Grandma kept it simple—no fancy tutorials, just warm water and dish soap.
Start by adding a little dish soap to a sponge and use it to scrub the cabinet doors and handles. If there’s built-up grease or grime, let the soapy water sit for about 10 minutes before wiping it away with a clean, damp cloth.
Don’t forget the inside! Dust the shelves, then wipe them down with the same damp cloth to remove any lingering dirt.
That’s Grandma’s secret to shiny, spotless cabinets—simple, effective, and hassle-free!
7. CLEANING THE STOVE

Start by removing the grates and burners. These parts tend to collect grease and food spills, so setting them aside will make cleaning easier.
Next, sprinkle baking soda all over the stovetop. Then, take a wet Scotch-Brite sponge, add a little dish soap, and scrub the surface well. Focus on stubborn spots where grease and food have built up.
Let the mixture sit for 5 to 10 minutes to break down any tough stains. Finally, wipe everything clean with a damp cloth or sponge, and your stove will look as good as new!
8. ELECTRIC STOVE

Cleaning your electric stove is easy, but it’s important to be gentle to avoid damage. Start by wiping the surface with a damp sponge that has a little dish soap on it. This will help lift off any grease or food spills from cooking.
Once you’ve scrubbed the surface, take another clean, damp cloth to wipe away any leftover soap and dirt. Make sure to wipe gently, as too much water or harsh scrubbing can harm the stove.
Be cautious around the stove’s electrical components, and avoid letting water get into the cracks or burners. By keeping the cleaning process simple and using just enough water, you’ll keep your electric stove looking great and working properly!
9. HOW TO CLEAN THE OVEN

Cleaning the oven might seem like a tough task, but with the right approach, you can get it sparkling clean while working on the rest of your kitchen. Here’s a simple way to tackle a messy oven.
Start by mixing vinegar and baking soda to create a thick paste. Spread this paste all over the oven’s interior, focusing on the areas with grease and food buildup. Let the paste sit for about 10 minutes to work its magic.
After it’s had time to sit, take a Scotch-Brite sponge and scrub the oven, paying attention to any stubborn spots. Finally, wipe down the inside with a clean, damp cloth to remove all the paste and dirt.
With this method, your oven will be clean and ready for your next cooking session!
10. THE QUICKEST WAY TO DEEP CLEAN A FRIDGE
To deep clean your fridge quickly, start by taking everything out. Remove the shelves and drawers so you can clean every corner.
Mix dish soap, vinegar, and water to create a cleaning solution. Use this to wipe down the inside of the fridge, paying attention to any spills or stains.
If your fridge has a no-defrost freezer, place a small pot of hot water inside to help release the ice. While the ice is melting, clean the bottom part of the fridge.
Once you’ve finished cleaning the fridge, go back to the freezer. Use a sponge with the same cleaning mixture to scrub it clean. This method will have your fridge looking fresh and spotless in no time!
11. HOW TO DEEP CLEAN KITCHEN TILE FLOORS
Cleaning kitchen tile floors can be a little tricky, especially if there’s grout between the tiles. Grout can build up with dirt and oil over time, but don’t worry—there are easy ways to clean it.
One option is to use OxiClean. Simply cover the grout with the powder, let it sit for a few minutes, then scrub it with a stiff brush to lift the dirt.
Another method is to mix vinegar, baking soda, and Dawn dish soap to create a cleaning solution. Apply the mixture to the grout, and use a toothbrush to scrub it out of the crevices.
Once you’ve scrubbed the grout, wipe away the residue with a cloth. Finish by mopping the floor with a damp mop. For an extra shine, mop twice to make sure all the cleaning solution is gone and the floor looks great!
12. DEEP CLEANING WOODEN FLOORS

Cleaning wooden floors is simple and effective. Start by filling a bucket with warm water, then add just a drop of dish soap. Be careful not to add too much, as too much soap can strip the wax from the wood.
Use a mop or a small towel to clean the floor. The dish soap works well to remove grease and food that may be stuck on the surface. Keep wiping until the floor looks clean and shiny.
After you’re done cleaning, let the floor dry completely before walking on it. This will leave your wooden floors looking fresh and well-maintained!
CONTINUE CLEANING
After cleaning, give your countertops a fresh touch by using a deodorizer like Fabulous to leave them smelling nice. However, never use any kind of deodorizer inside the fridge, except for a simple box of baking soda. Other deodorizers can contaminate your food.
Next, replace the trash bag with a fresh one and place the bin back in its designated spot. Organize all the items in their proper places, and take a moment to step back, look at your hard work, and give yourself a well-deserved pat on the back.
That’s all for Grandma’s kitchen cleaning tips! Now, it’s time to relax. Grab a cup of coffee or tea and take a well-earned break.
Thanks for stopping by! And don’t forget to follow us on Pinterest for more tips and ideas: Mom’s Daily Life

